One of the most intriguing endgame scenarios is the Rook and Knight checkmate, or the Arabian checkmate.
While it’s less common than the basic King & Rook vs. King checkmate, mastering the Rook & Knight checkmate can elevate your endgame skills and might be something you’ll have to execute in your chess career.
The Rook and Knight Checkmate involves coordinating a rook and knight to trap and checkmate the opposing king, typically with the aid of their own king.
The Arabian Checkmate is a classic checkmating pattern where a knight and a rook work together to checkmate the enemy king.
We look through both examples in this article.
Theis makes the Rook and Knight checkmate helpful to learn.
The Basics of the Rook & Knight Checkmate
The Unique Strengths of Each Piece
The Rook and Knight, when working in tandem, can control a significant portion of the board.
The Rook’s linear movement combined with the Knight’s unique L-shape jump allows them to cover squares that would otherwise be unreachable.
The King’s Role
In this checkmate, the King isn’t just a passive piece waiting to be protected.
It plays an active role in controlling squares, blocking the enemy King’s escape routes, and working in harmony with the Rook and Knight.
It may or may not be needed to help deliver checkmate.
A true knight and rook checkmate is known as the Arabian checkmate.
Boxing in the Opponent
The first step is to restrict the enemy King’s movement.
Using the Rook, you can cut off ranks or files, effectively reducing the board’s size for the enemy King. The Knight can then jump in, threatening squares that the Rook can’t immediately control.
Example of the Rook and Knight Checkmate
Our first step is to get the king down to the final rank (or file) and cut off its ability to get out of it using the rook.
Be sure to move the rook away from the king to avoid it being unnecessarily attacked.

Move the king into a position where it will function by potentially needing to protect the rook.

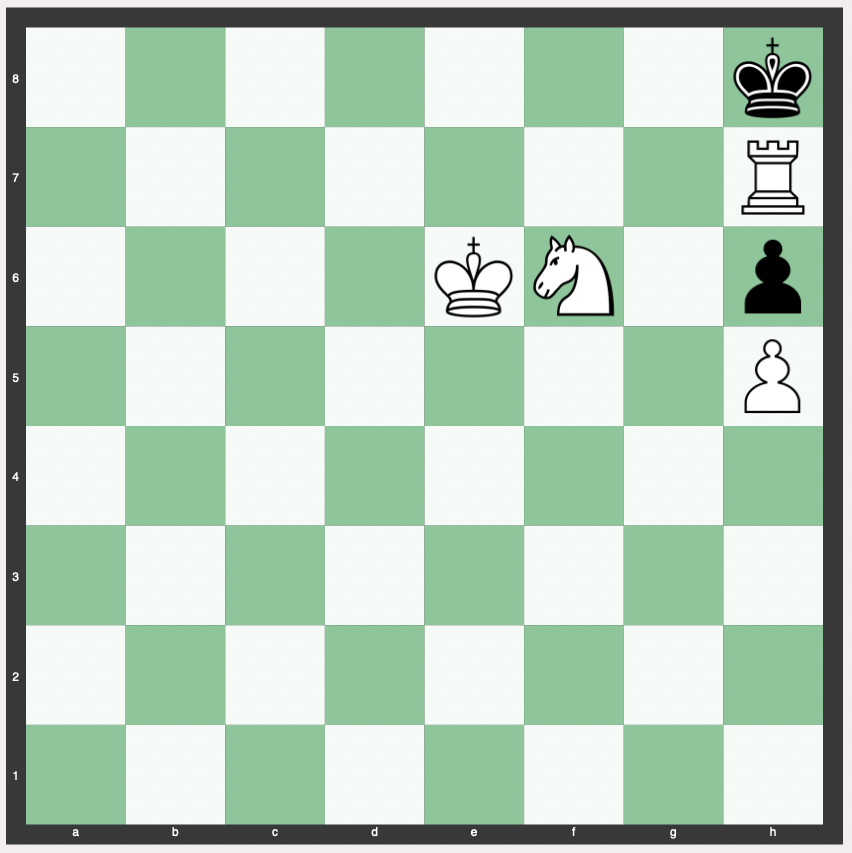
Here we can place the knight next to the king and black has only two escape squares – f8 or g8.

Arabian Mate Examples
If the king goes to g8, we apply checkmate via Rh7#.
This is known as the Arabian mate.
The rook is protected by the knight and the king can’t move to g8.

The Rook and Knight checkmate pattern (Arabian mate).

Rook, Knight, and King Checkmate
Alternatively, if the king goes to f8, we can do Rf7# checkmate.
The rook is protected by the king and the knight takes away the e8 and g8 squares.

Another form of the Rook and Knight checkmate pattern.

Another example of the same concept is below.
This is not an Arabian mate given white’s king needs to be used to defend the rook.

‘Game of the Century’ Arabian Mate
The “Game of the Century” between Donald Byrne and Bobby Fischer (then age 13) featured an Arabian mate:

Common Mistakes to Avoid
Over-reliance on the Rook
While the Rook is a powerful piece, overusing it can lead to stalemates.
It’s essential to involve the Knight early and ensure it’s in a position to threaten the enemy King.
Not Using the King Actively
As mentioned, the King isn’t just a bystander in this checkmate.
Failing to use the King actively can prolong the game and even miss checkmate opportunities.
FAQs – Rook and Knight Checkmate
What is the Rook & Knight Checkmate?
The Rook & Knight Checkmate refers to a checkmating pattern in chess where one side uses a rook and a knight to checkmate the opposing king.
The side delivering the checkmate typically has a king as well, which plays a big role in controlling key squares and driving the enemy king into a vulnerable position.
How does the Rook & Knight Checkmate differ from other checkmates?
The Rook & Knight Checkmate is unique because it involves coordinating the movements of two different pieces (rook and knight) with distinct movement capabilities.
While the rook moves in straight lines (horizontally and vertically), the knight moves in an L-shape.
This combination can be tricky to handle, especially for beginners.
Other common checkmates, like the King & Rook vs. King or King & Queen vs. King, involve pieces that have more straightforward movement patterns and are generally easier to execute.
What are the key positions to aim for in a Rook & Knight Checkmate?
The key to the Rook & Knight Checkmate is to use the rook and knight to control squares and restrict the movement of the opposing king.
Ideally:
- The rook should be used to cut off the enemy king’s escape routes, either by controlling a rank or file.
- The knight can jump over other pieces and threaten squares that the rook cannot, making it a valuable tool for delivering the final checkmate or controlling key squares.
- Your king should be actively involved, helping to drive the enemy king towards the edge or corner of the board.
How can the defending king escape or delay the Rook & Knight Checkmate?
The defending king can try to stay in the center of the board, where it has the most mobility.
Avoiding the edges and corners is crucial, as these are the areas where the king is most vulnerable to checkmate.
Additionally, the defending side can attempt to attack or put pressure on the rook or knight, forcing them to move defensively rather than focusing on the checkmate.
Are there any common pitfalls or mistakes to avoid when trying to achieve a Rook & Knight Checkmate?
Yes, there are several common mistakes:
- Not involving the king: Your king is a powerful piece in the endgame and should be used actively to help drive the enemy king into a vulnerable position.
- Mis-coordination between the rook and knight: It’s essential to ensure that the rook and knight work together. Misplacing them can allow the enemy king to escape.
- Stalemate: Be cautious not to accidentally stalemate the enemy king, especially when it’s near the edge or corner of the board.
How many moves does it typically take to achieve a Rook & Knight Checkmate from the starting position?
Achieving a Rook & Knight Checkmate can vary in the number of moves based on the position of the pieces and the skill of the players.
However, with optimal play from both sides, it can take anywhere from a few moves to over twenty moves to achieve the checkmate from a starting position where the pieces are randomly placed.
It’s worth noting that while the Rook & Knight combination can force a checkmate, it’s not as straightforward as other checkmating combinations like King & Queen vs. King.
Are there any famous games or examples of the Rook & Knight Checkmate in professional chess?
While the Rook & Knight Checkmate is a recognized theoretical endgame, it’s relatively rare in top-level professional games because players usually resign before reaching such a simplified position, knowing the outcome.
However, there have been instances in lower-level tournaments or rapid/blitz games where this checkmate has occurred.
Studying endgame manuals or databases can provide specific examples of this checkmate.
What are some drills or exercises to practice the Rook & Knight Checkmate?
- Set up positions: Start by placing the defending king in various positions on the board and practice delivering the checkmate with the Rook & Knight.
- Timed drills: Give yourself a set amount of time to achieve the checkmate. This helps improve efficiency and decision-making under pressure.
- Practice with a partner: Have a friend or chess engine defend with the lone king while you try to deliver the checkmate.
- Endgame studies: There are specific endgame studies and puzzles designed around the Rook & Knight Checkmate. Solving these can improve understanding and technique.
Is the Rook & Knight Checkmate considered difficult to achieve compared to other checkmates?
Yes, the Rook & Knight Checkmate is considered more challenging to achieve than some other basic checkmates, such as King & Rook vs. King or King & Queen vs. King.
The unique movement patterns of the rook and knight require precise coordination, and there’s a higher risk of stalemate if not executed correctly.
How can one defend against a Rook & Knight Checkmate if they are on the receiving end?
- Stay central: Keep the defending king in the center of the board for as long as possible to maximize mobility.
- Avoid the edges and corners: These are the most vulnerable areas for the defending king.
- Threaten the attacking pieces: If possible, put pressure on the rook or knight, forcing them to move defensively.
- Be aware of stalemate opportunities: If the attacking side is not careful, they might accidentally stalemate the defending king, especially when it’s near the edge or corner of the board.
Related

