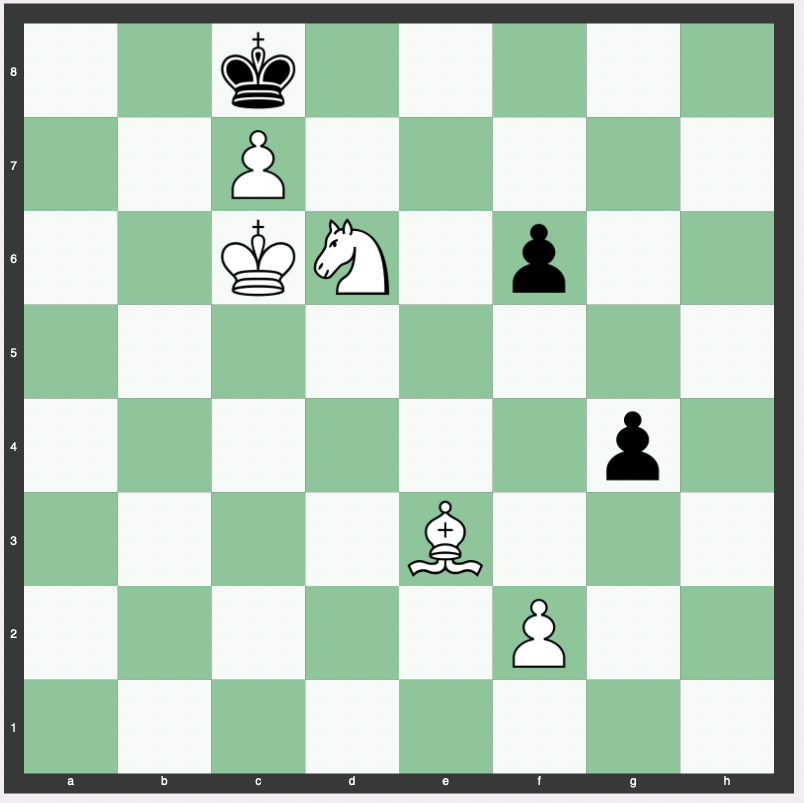
The knight and pawn checkmate is one of the more complex and nuanced endgames that involves orchestrating a checkmate with just a knight and a pawn against a lone king.
In most cases, other pieces are also available.
This scenario, although rare, demands a deep understanding and mastery of the chessboard.
Here we look into how to achieve a knight and pawn checkmate.
Understanding the Basics
Before venturing into the nuances involved in executing a knight and pawn checkmate, it is essential to grasp the fundamental movements and capabilities of both the knight and the pawn.
The Knight’s L-Shaped Move
The knight moves in an L-shape pattern, which can be either two squares in one direction followed by one square perpendicular to the initial direction or vice versa.
This unique movement allows the knight to jump over other pieces, making it a versatile piece in navigating a cluttered board.
The Pawn’s Journey to Promotion
The pawn, on the other hand, moves forward one square but captures diagonally.
Its true potential is realized when it reaches the opponent’s back rank, where it can be promoted to any piece, except a king.
In the context of the knight and pawn checkmate, promoting the pawn to a queen is the most potent strategy to secure victory.
Crafting the Strategy of the Knight & Pawn Checkmate
Achieving a checkmate with a knight and pawn requires a well-crafted strategy.
Here, we will explore the step-by-step process to navigate your pieces effectively to corner the enemy king.
Step 1: Centralizing Your King
The first step involves bringing your king to a central position on the board.
This move not only restricts the movement of the opponent’s king but also facilitates the coordination between your king and other pieces.
Step 2: Advancing the Pawn
Next, start advancing your pawn toward the promotion square.
However, it is crucial to maintain the support of the knight and king to prevent the pawn from being captured.
Generally how the knight and pawn checkmate occurs is when the king is needed to block promotion and the knight can come in and deliver the checkmate, with the pawn protected by your own king.
Example of a Knight & Pawn Checkmate
Let’s look at this sequence.
Here white checks the black king with the pawn, protected by a pawn and threatening promotion:

White’s knight checks the black king to force it back to the c8 square.

The king moves off to cut off the king’s viable moves.
Note that if the king is the only piece on the board, this will result in a stalemate and drawn position (and thus shouldn’t be played).

Black moves its rook down. Given mate is forced, black’s best move to elongate the game is to trade a rook for a pawn.
White centralizes its knight again, preparing checkmate.

White captures the rook.
This pawn is now in key position to cut off the b8 and d8 escape squares.
Black has just one move left before checkmate and must move one of the pawns.

White can now deliver the checkmate via either Nb6# or Nd6#.

The knight delivers checkmate. (If you’re interested, we have the complete game below.)

Expert Tips for a Successful Execution of the Knight & Pawn Checkmate
To further enhance your ability to execute a knight and pawn checkmate, here are some expert tips that can provide a deeper insight into this complex endgame:
Utilize Zugzwang
Zugzwang is a situation in chess where one player is put at a disadvantage because they must make a move.
In the knight and pawn endgame, forcing the opponent into a zugzwang can be a powerful strategy to advance your pawn safely.
Understanding the Critical Squares
Having a deep understanding of critical squares, which are the squares that control the pathway to promotion, can be a game-changer.
Utilize your knight effectively to control these squares and pave the way for your pawn’s promotion.
Practicing Different Scenarios
Given the complexity of this endgame, practicing different scenarios can be immensely beneficial.
It allows you to understand the nuances better and develop strategies to tackle various positions effectively.
Related


