

When to Trade Queens in Chess? (Queen Exchange)
Trading queens, or the “queen exchange,” is a significant decision in a game of chess.
The queen is the most powerful piece on the board, and deciding when to trade it can have a BIG impact on the outcome of the game.
Here are some situations where trading queens might be beneficial:
To Simplify the Position
Trading queens can lead to a simpler position, reducing the complexity of the game.
It can be a good strategy when you have a material advantage, as it makes it easier to convert that advantage into a win.
It can also be a quality strategy even in positions without a material advantage.
In the example below, black’s optimal move would be to not exchange queens.

However, if black can’t find this move on their own (would give black a -4.25 advantage), it could be a worthy simplification to accept the queen exchange to alleviate threats (and still leave black with a -1.00 advantage).
To Avoid a Queen Trap
If your queen is being targeted and has limited squares to move to, it might be wise to consider trading queens to avoid getting trapped and losing the queen for nothing.
When You’re Up Material & Want to Transition into a Favorable Endgame
If you assess that your pawn structure and piece activity are superior in the endgame, trading queens can be a strategic decision to transition into a favorable endgame position.
To Exploit Weaknesses in the Opponent’s Structure
Sometimes, trading queens can allow you to exploit weaknesses in your opponent’s pawn structure more easily, as the queens won’t be there to defend key squares.
To Neutralize Opponent’s Attack
If your opponent has a strong attack going, especially with their queen being active and threatening, trading queens can help neutralize the attack and reduce the pressure.
To Focus on Development
In the opening or middle game, if you find that trading queens allows you to focus better on developing your pieces and controlling central squares, it might be a good choice to trade queens.
To Alleviate King Safety Issues
If your king is unsafe, and there are threats looming, trading queens can sometimes alleviate the immediate dangers and give you time to improve your king’s safety.
To Execute a Specific Tactical or Strategic Plan
Sometimes, trading queens is part of a specific tactical or strategic plan where the resulting position offers you clear benefits, such as targeting weak squares or exploiting open files.
To Force a Draw
In situations where you are at a disadvantage, trading queens can sometimes help in forcing a draw, especially if it leads to a simplified position with reduced material on both sides.
To Prevent the Opponent from Castling
There are lines in certain positions early in the game (e.g., certain lines of the Ruy Lopez, Berlin Defense) where there’s an early queen exchange and can prevent the opposing side from castling.
Castling is often key in king safety in certain positions.
Preventing the other side from castling can convey a little bit of an advantage.
Avoid Sharp Lines Against a Stronger Player
A weaker player will often want to exchange queens to avoid engaging is sharper, more tactical positions against a stronger player.
That can increase the odds of at least getting a draw.
When to Exchange Queens – Example
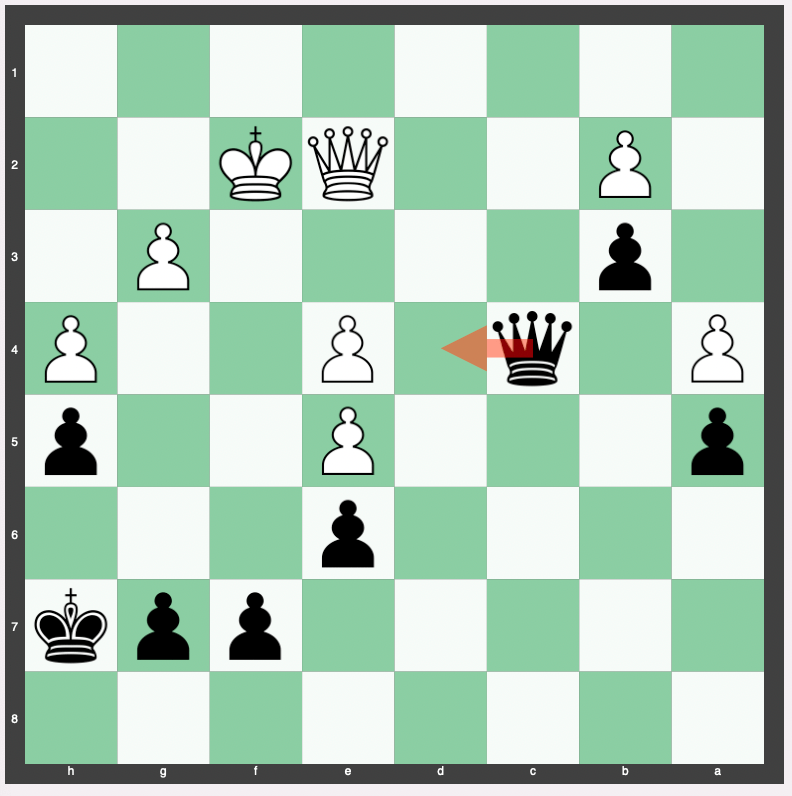
Take the following position where black offers to exchange queens.
Material is even but black has the better position due to more advanced pawns and white’s doubled pawn that represent a structural flaw in its position.

White refuses the trade.
In this position, black gets the option to trade queens.
But if it sees a better move and its queen isn’t hanging it’ll choose that instead.
Black is happy to give white the option to take its queen again, given it would allow the b-pawn to recapture the queen and make a new queen on the next move.

On black’s next move it decides to refuse the queen trade because it sees a better move again.
This time, it can check the white king and give it the option to take the e5 pawn on the next move should it believe that’s the best move.

Here white decides to offer another queen trade.
Black refuses believing it’s in better position to do damage with its own queen from this position.
It can move to c4, which both protects the b3 pawn and attacks white’s a4 pawn (and potentially the e4 pawn if white’s queen moves to a square that no longer defends it).
This is a quality multi-purpose move.

White re-offers the queen trade.
Black refuses by checking the white king, and threatening multiple pawns as well.
Moreover, it prevents white’s queen from taking the h5 pawn on the next move and checking the black king.
Later, black decides to take the a4 pawn.
This gives a 2-on-1 situation that can be exploited later on in the game (at least the option to, depending on how the game goes).
Also, it will enable the black queen to protect the b3 pawn and a5 pawn at the same time, and also give it a path to retreat to its backrank to protect its king.

The queen can also shepherd pawns toward promotion.
In this case, the black queen is stronger than the white queen and has few offensive threats.

Black decides to re-offer the queen trade.
If white accepts, the black pawn will recapture the white queen and promote to a new queen.
Black would essentially get a new queen for free and make the conversion of the position (to checkmate or resignation) very easy without having to deal with any dynamic pieces.

Naturally, white refuses the queen trade and decides to check black’s king.

Below, black’s queen is vastly stronger than white’s queen.
The black queen can take the e5 pawn.
This move also accomplishes several purposes:
- threatens the e4 pawn
- enables a2 on the next move and the promotion to a new queen (or another piece) since the queen on e5 defends the a1 square
- prevents a check on the black king from white playing g5 on the next move
- keeps easy threats on the white king

Here black can use its queen to promote on a1 and immediately take the white queen if black decides to promote to a queen.
However, if black wants to promote to a rook, it would not increase the number of moves to checkmate.

So, the queen exchange never happened in this case.
It never made sense for either side.
Black eventually used its new rook to checkmate the white king six moves later.
When to Exchange Queens – Example #2
Here, black is up one pawn of material with commensurate positional compensation (evaluated at around -1.2), and decides to hunt out the queen exchange:

White will generally turn this down unless not accepting the queen exchange will make its position worse.

If you can’t get a queen trade, you can smartly try to induce the exchange of other material to get to a favorable endgame.

Later on in this game, black is now able to force a queen trade by checking the king while venturing into a square the white queen controls (while black’s queen is protected by its own rook):

Example of When Not to Trade Queens
In the following example, black has roughly a -6.00 edge on white in the game.
However when white offers this queen trade, black would blunder checkmate-in-2 by accepting it.

If black accepted the queen trade the continuation 33. Nc7+ Kf8 34. Rd8# is mate.

When to Trade Queens – Example #3
Below is an example of black being up a pawn, with ample positional edge.
So, black should aim to trade down and win an endgame where a pawn promotes to a queen and wins the game.

White should also deny the queen trade and try to create complications to save the game.
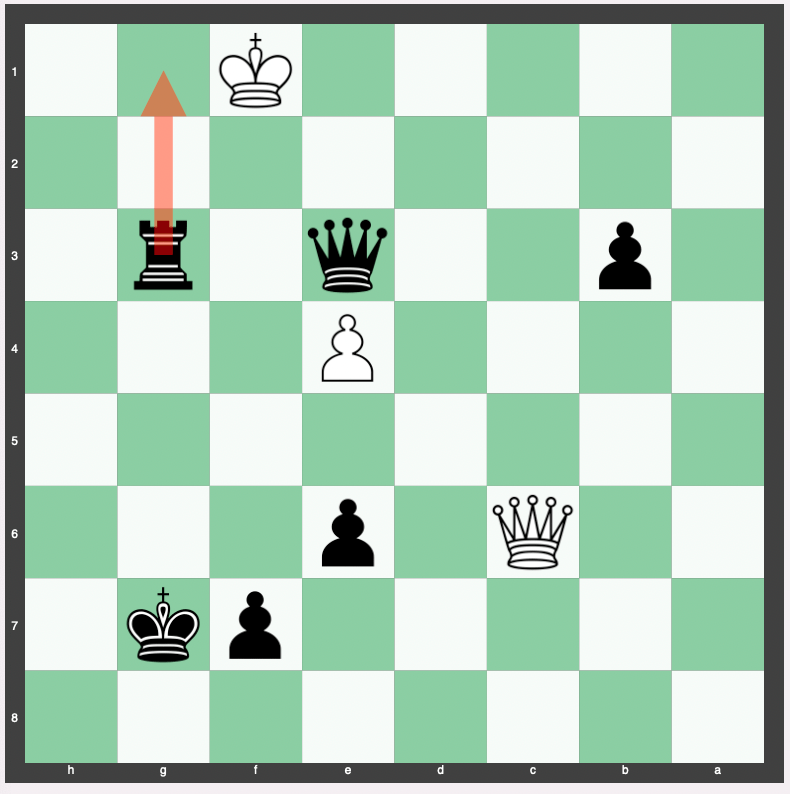
How to Force a Queen Trade
A continuation of the example above, the position below shows an example of how to force a queen trade:

While not technically forced, white’s optimal move is to go to g3 with the queen, offering a queen trade.
Queen trades are more likely to be had when there are cases of:
- Check
- Threat of winning more material
- The queen is defending and/or attacking key squares
- Having the queens on the boards offers clear compensation going forward
When to Exchange Queens but Changing the Terms of the Exchange – Examples
What we mean by this is exchanging queens but reorienting the terms of the potential exchange.
Example #1
For example, let’s say black offers up a queen trade that you could take.

But let’s say you’re willing to accept the trade, but on different terms – i.e., a different position post-trade.
So you move the Queen to f8:

That way, you can get your rook to f8 and potentially swing it over the h8 in later moves to launch a king-side attack.
An example continuation would be:
27. Qxf8 Rxf8 28. Bc2 Ne6 29. Kf2 Kg7 30. Ke2 Nc5 31. Kf3 Raa8 32. Rd2 Rh8 33. Rdd1 Kf8 34. Ra1 Ke7 35. a5 Ne8
Black is considered to have the edge in this position, evaluated at -2.50 to -3.00.
Example #2
Another example is a position from above.
White offers the queen trade.
Black can change the terms of the queen trade by moving its rook to h5.
This basically says, you can have my queen on the terms of then having my rook on e5.

Q&A – When to Trade Queens in Chess (Queen Exchange)
What is a Queen Exchange in Chess?
A queen exchange in chess refers to a situation where both players decide to trade their queens, either willingly or due to a forced sequence of moves.
This exchange can significantly alter the dynamics of the game, shifting it from a middle-game to an endgame scenario, where the focus turns to promoting pawns and utilizing minor pieces more strategically.
When is the Ideal Time to Trade Queens?
The ideal time to trade queens can vary greatly depending on the specific circumstances of the game.
Generally, it is considered favorable to trade queens when you have a material advantage, better pawn structure, or a safer king.
Trading queens can also be a good strategy when your opponent’s queen is more active and poses a significant threat to your position.
What are the Pros and Cons of Trading Queens Early in the Game?
Trading queens early in the game can have both advantages and disadvantages.
Pros:
- Simplifies the position, reducing the complexity of the game.
- Removes the most powerful piece from the board, which can be beneficial if your opponent is more skilled in utilizing the queen.
Cons:
- Can lead to a dull and less dynamic game.
- If done without a clear advantage, it can equalize the position, giving away any initiative you had.
How Does Queen Exchange Affect the Endgame?
Queen exchanges often lead to endgames that are focused on pawn structures and the activity of minor pieces.
Without queens, the kings can become more active and centralize without the fear of getting checkmated.
It also often leads to a race to promote pawns to queens, with tactics revolving around creating passed pawns and utilizing the remaining pieces to support or stop these pawns.
Can Trading Queens Help in Defending Against an Attack?
Yes, trading queens can often help in defending against an attack, especially if the opponent’s queen is central to their attacking plans.
By exchanging queens, you can reduce the attacking potential of your opponent’s pieces and simplify the defense of your position.
Are There Specific Openings That Naturally Lead to Queen Exchanges?
Yes, there are several chess openings that can naturally lead to queen exchanges.
Some of them include:
- The Exchange Variation of the Ruy Lopez
- The Queen’s Gambit Accepted
- Certain lines in the French Defense
In these openings, queen exchanges can occur as a natural consequence of the main line moves.
How Can I Practice Queen Exchange Scenarios?
Practicing queen exchange scenarios can be done through studying endgame theory, analyzing grandmaster games where queen exchanges occurred, and playing out queen exchange positions against a chess engine or a sparring partner.
It is beneficial to familiarize yourself with common pawn structures and king and pawn endgames, as these often arise after a queen exchange.
Conclusion
The decision to trade queens should be based on a careful evaluation of the specific circumstances in your game, and it is not always beneficial to trade queens.
It is often a good practice to calculate several moves ahead to understand the implications of the queen exchange.

![Ranking Opening Moves in Chess [All 20]](https://i0.wp.com/ppqty.com/wp-content/uploads/2023/04/Screen-Shot-2023-04-04-at-7.22.16-PM.png?fit=761%2C765&ssl=1)
![Fortress in Chess [Examples]](https://i0.wp.com/ppqty.com/wp-content/uploads/2023/04/Screen-Shot-2023-04-17-at-1.28.20-PM.png?fit=768%2C773&ssl=1)


