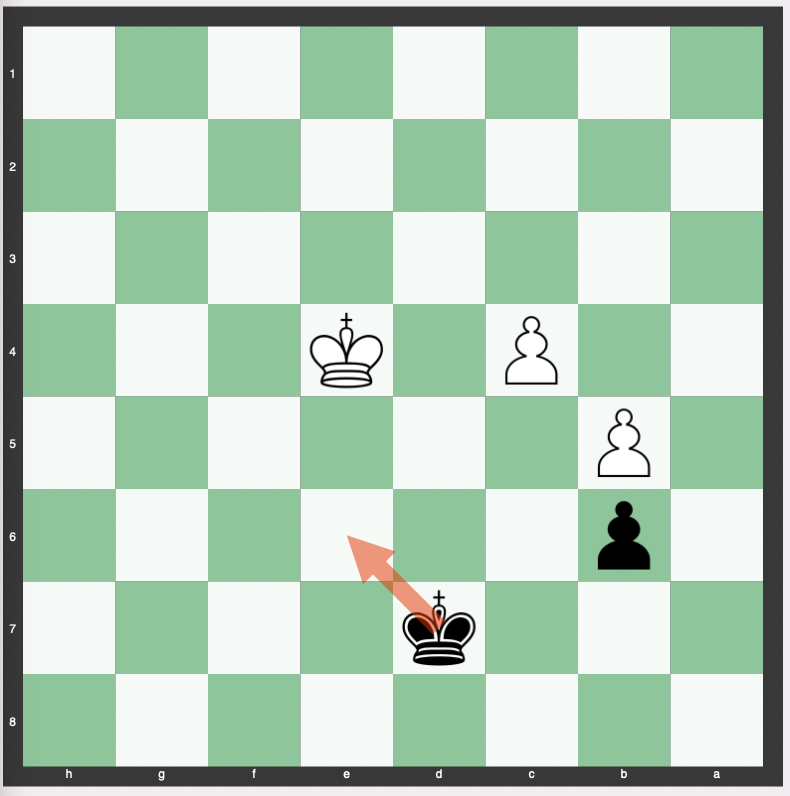
The two pawn versus one pawn endgame in chess is a critical position that often determines the outcome of the game.
The position of the kings and pawns plays a significant role in deciding the outcomes.
Understanding the intricacies and strategies involved in this endgame scenario is essential for both the attacking and defending player.
Importance of King and Pawn Position
Attacking Side
For the side with two pawns, the position of the king is crucial.
The king must support the advancement of the pawns to help them safely reach the eighth rank and promote to a queen.
A well-placed king can protect the pawns from attacks, block the opposing king, and help in creating a passed pawn.
Defending Side
On the defending side, the key is to ensure that the king is in a position to prevent the enemy king from supporting the pawns’ queening.
The defending king must be active and central, ready to attack the advancing pawns and block the opposing king’s path.
The defending side has to be very careful.
Example of Two Pawn vs. One Pawn Endgame
For example, from this position, the black king has 8 possible moves, but 7 of them result in forced checkmate. 1 of them retains the draw.
Black here needs to prevent the king from getting to a position where it can help advance the pawn. For this reason, only e6 is viable.

From this position, black only has one square again. It has to go back to d7.

From this position, the king has to go to e7:

If the king goes up, the pawn will eventually queen via:
101. Kd4 Ke6 102. c5 Kd7 103. c6+ Kd6 104. Ke4 Ke6 105. c7 Kd7 106. Ke5 Kxc7 107. Ke6 Kc8 108. Kd6 Kb7 109. Kd7 Kb8 110. Kc6 Ka7 111. Kc7 Ka8 112. Kxb6 Kb8 113. Ka6 Kc7 114. b6+ Kd6 115. Kb5 Ke5 116. b7 Kf6 117. Kc5 Kf5 118. Kd5 Kg5 119. b8=Q
From the position below, only e6 or d7 is viable given the position of the king:

Below, four squares are viable given the position of the king – d6, d8, c7, and c8.
Moving away would result in forced checkmate.

Below, every legal square works for the black king.

From this position below, the defending king can’t go in or down. Only c7 or c8 work or else checkmate will be forced:

For example, if the king goes to b8, queening of the pawn will occur via:
109. Kd4 Kc7 110. Ke5 Kd7 111. Kd5 Kc7 112. Ke6 Kc8 113. Kd6 Kb7 114. Kd7 Kb8 115. Kc6 Kc8 116. Kxb6 Kd7 117. c5 Kc8 118. Ka7 Kc7 119. c6 Kd6 120. Kb7 Ke5 121. c7 Kd5 122. b6 Ke4 123. Ka6 Kf4 124. b7 Kg5 125. b8=Q
The defending king also can’t go into the space between the two pawns:

One of the pawns will queen via:
113. Kc3 Kd6 114. Kd4 Ke6 115. c5 Kd7 116. c6+ Kd6 117. Ke4 Kc7 118. Kd5 Kc8 119. c7 Kxc7 120. Ke6 Kc8 121. Kd6 Kb7 122. Kd7 Kb8 123. Kc6 Ka7 124. Kc7 Ka8 125. Kxb6 Kb8 126. Ka6 Kc7 127. b6+ Kc8 128. Ka7 Kd7 129. b7 Ke6 130. b8=Q
If the attacking king goes out wide, black has to mirror the king:

If the pawn moves down, taking it is the only move:

This will now turn into the King and Pawn Endgame.

From here, the key is for the defending king to mirror the attacking king and pawn.
Strategies for the Defending Side
Blocking the Opposing King
The defending side should focus on keeping the opposing king away from the pawns.
By doing this, the defending player can prevent the forced checkmate scenario and increase the chances of achieving a draw.
The defending king should aim to control crucial squares and maintain flexibility to move to either side of the board.
Attacking the Pawns
Simultaneously, the defending side should aim to attack the advancing pawns.
Eliminating even one pawn can significantly increase the chances of a draw, as it simplifies the position and reduces the attacking side’s advantage.
Conclusion
The two pawn versus one pawn endgame is a delicate balance of king and pawn positioning.
The attacking side aims to use the king to support the pawns’ advancement, while the defending side works to block the king and attack the pawns.
Proper understanding and execution of these strategies can lead to a successful defense or a victory in this endgame scenario.


